Test Driven Development with JUnit and Mockito
- Nguezang Arsene

- May 8, 2019
- 5 min read
Updated: May 18, 2019
Test-driven development (TDD) is an approach to programming that, somewhat counterintuitively, encourages developers to write tests of their code before actually writing the code itself. (source: codecademy https://news.codecademy.com/test-driven-development)
Mockito is a mocking framework, JAVA-based library that is used for effective unit testing of JAVA applications throughout implementation. Mockito is used to mock (make a fake) interfaces so that a dummy functionality or feature can be added to a mock interface that can be used in unit testing. This post should help you learn how to create unit tests with Mockito as well as how to use its APIs in a simple and intuitive way.
let's get our hands dirty. To have a better understanding of this concept, let's do an example.
Requirements
Jdk 8 and above
An IDE (Intellij or any other IDE used to build java applications)
Problem Statement
Implement code for a component named, ArrayReversor, as a Java command-line (console) application. In your component (class), implement a method named, reverseArray(), which takes as input, a two dimensional (2-D) nested array and returns as output, the reverse of the flattened array (i.e. a one dimensional array containing elements of the nested array, flattened and reversed). For example, given an input a_in = [[1,3], [0], [4,5,9]], your method should return the input elements in a new flattened and reversed array as,
a_out = [9,5,4,0,3,1]. Note: In order to reverse a given 2-D nested input array, your component needs to first flatten it. To perform the flattening, your solution should use a service named, ArrayFlattenerService; with a method named, flattenArray, which takes a 2-d nested array, flattens it and returns a flattened 1-d array. However, this service is remote and/or unavailable; therefore you will have to implement code to create a mock of it and then use the mock in implementing the unit testing of your ArrayReversor component. Using JUnit, implement unit tests for your ArrayReversor component and its reverseArray() method; covering the following two test-cases: 1. When the input is a legit 2-D nested array, such as [[1,3], [0], [4,5,9]]. 2. When the input is a null. In both of your unit test-cases, include code that verifies that the ArrayFlattenerService was indeed invoked and not just by-passed (e.g. by harding-coding the correct expected result/output from its invocation). Analysis of problem statement
The sentences underlined in the problem statement gives us a clue on how to solve this problem. We are testing a sub-system(or class) that needs to communicate with another sub-system (or class) which is not available, so we need to fake the behavior of this unavailable sub-system to investigate the correctness of the one we are currently dealing with.
Solution
This problem can have different solutions but for the purpose of simplicity, we will implement the solution as a maven project
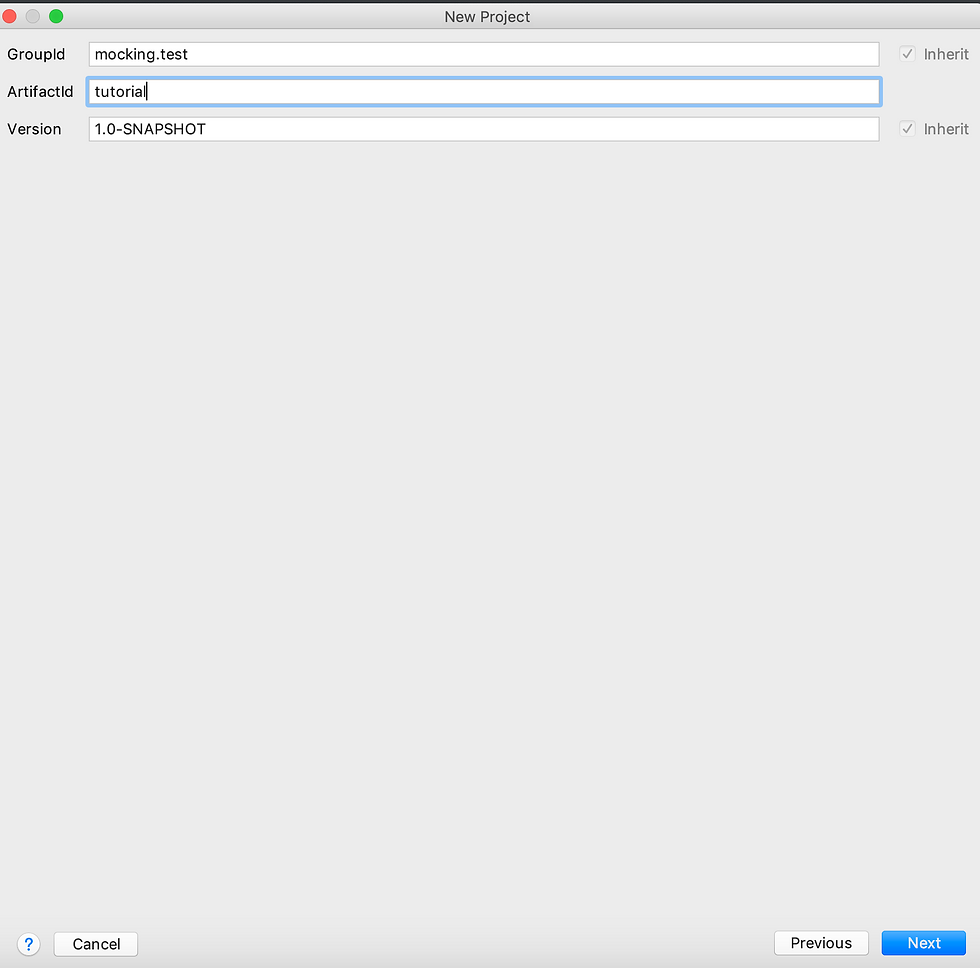
Step 1: Create a new maven project called MockingTutorial as follows. With Intellij IDEA, it is as follows;

Next give a groupId and an ArtifactId as shown in the next picture(You can call it what you want)
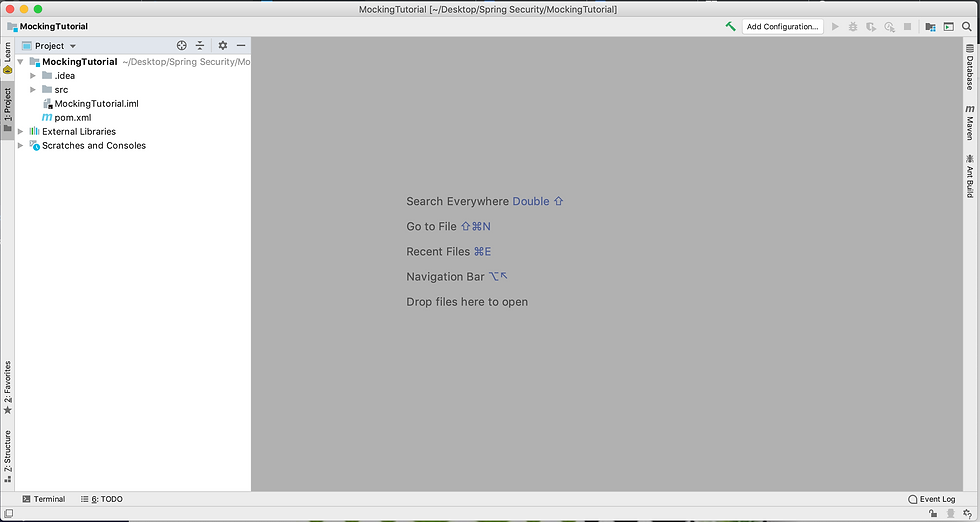
Give the project a name (MockingTutorial) and then you should have it opened and ready as shown below
Step2: Add JUnit and Mockito dependencies
To be able to have the mocking and JUnit functionalities in our project, we need to add their dependencies to our pom.xml file. The dependencies are gotten from the maven repository website https://mvnrepository.com/. Search for (JUnit and Mocking then select the most recent stable version, then copy and paste in your pom file as shown below)

Step 3: A package named mocking.test.tutorial is automatically created in the project as specified by the goupID and ArtifactId you gave during project creation under src->main->java. if you don't have this, create it. (This is to keep our work organized). In this package, create a class called ArrayReversor and implement a method called reversedArray() that takes a nested array of integers and returns a reversed array of integers. Then create another package called service, In this package create an interface called ArrayFlattenerService that represents the unavailable subsystem we are faking. Create a method called flattenArray() in this that takes a nested array of integers and returns a flattened array of integers. In the class ArrayReversor make an instance of ArrayFlattenerService then use it to create the constructor of ArrayReversor.
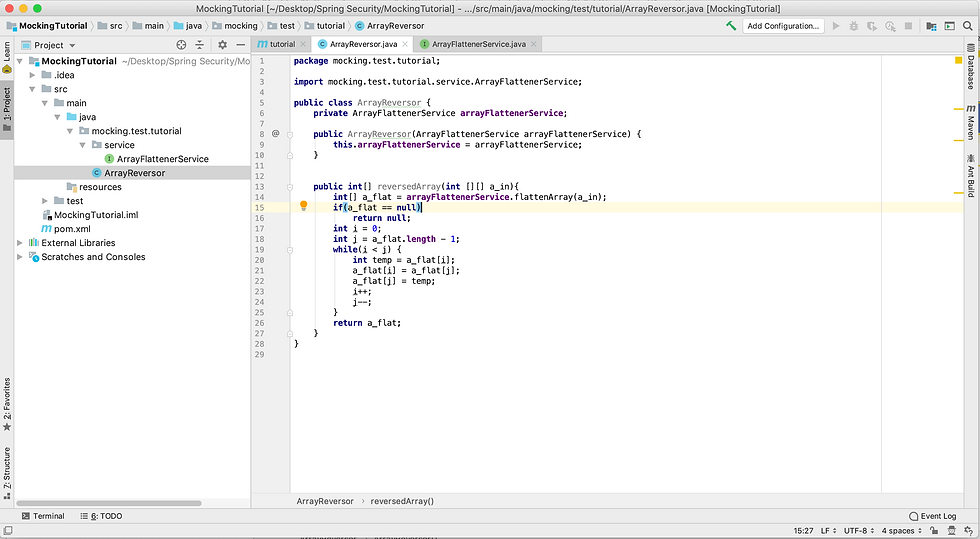

Note: You can have your own custom implementation of the function reversedArray()
Step 4: Create a jUnit test Class called ArrayReversorTest. On mac, highlight the class and press option+Enter and select create test. You choose the fields necessary for the test as shown below

Go to test->java->mockito.test.tutorial to see the newly created JUnit test class. as shown below

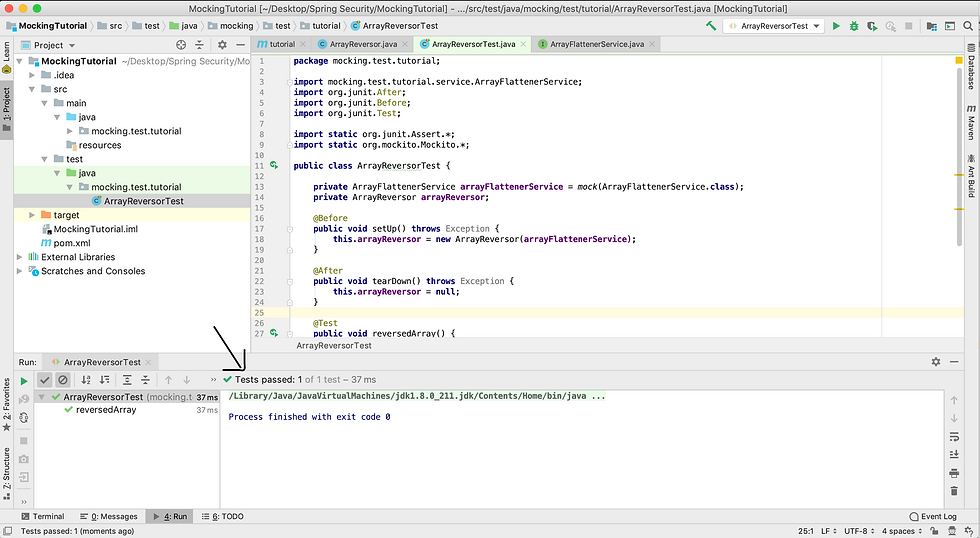
We then implement all the methods in this class as shown below
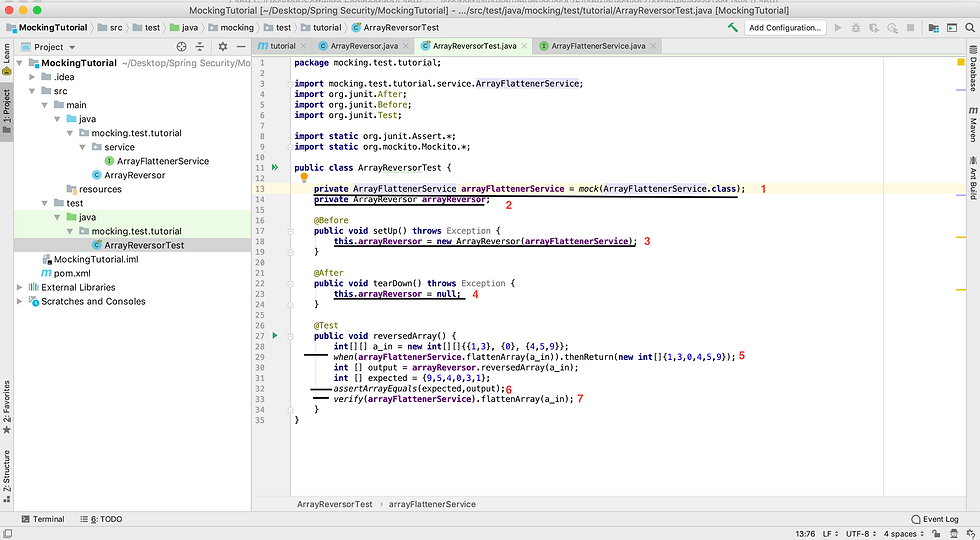
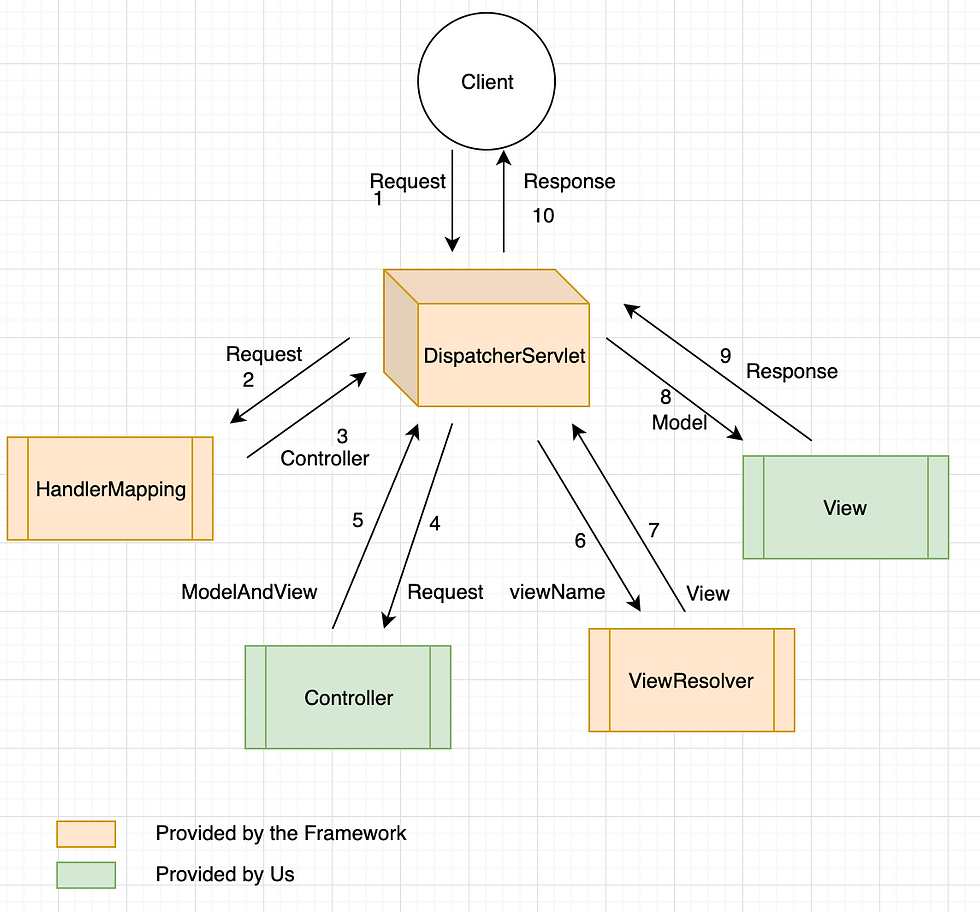
The above diagram describes the steps involved in testing our system using mockito and JUnit.
Create an Instance of the ArrayFlattenerService, we will need to call the function flattenArray() that is in it. Observe that this interface was assigned to mock() that takes as parameter a class. This line of code is to explicitly tell mockito that this is the Service we are mocking in our test. // Mock the dependencies
We create an instance of the class ArrayReversor as we will need to call the method reverseArray()
the function setUp() as the name implies is setting up the environment for the test. It can be viewed as an pre-condition for our test
the function tearDown() points the current instance of ArrayReversor to null. It can be viewed as an post-condition after the test
To create a stub (or a mock), use mock(class). Use when(mock).thenReturn(value) to specify the stub value for a method. If you specify more than one value, they will be returned in sequence until the last one is used, after which point the last specified value gets returned. //configuring a simple return behavior for mock
The assertArrayEquals() method will test whether two arrays are equal to each other. In other words, if the two arrays contain the same number of elements, and if all the elements in the array are equal to each other.
verify() is used to check the calls on the mock objects. Mockito keeps track of all the method calls and their parameters to the mock object. You can use the verify() method on the mock object to verify that the specified conditions are met. For example, you can verify that a method has been called with certain parameters.
Step 5: Run the test
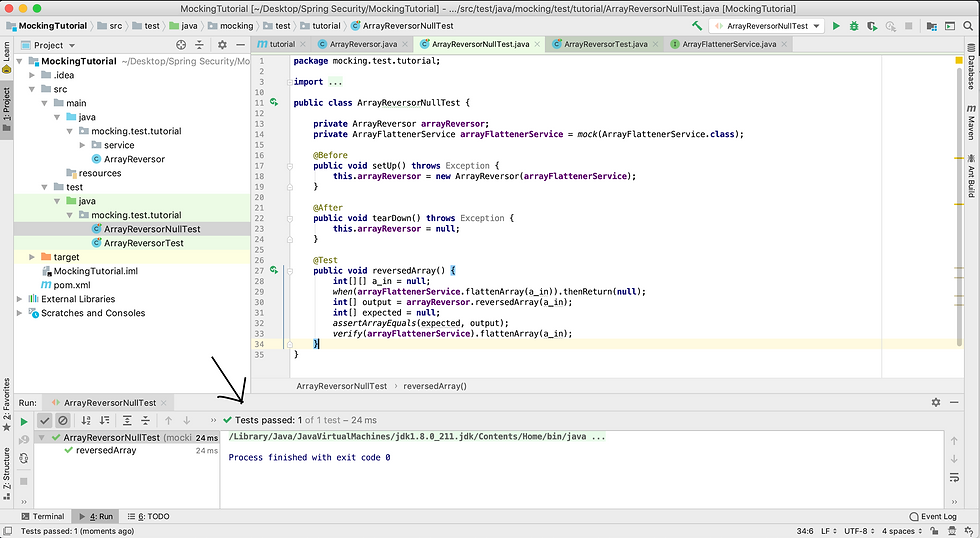
Step 6: Testing for Null
This is the same as the test above with exception that we are investigating the behavior of our system in case where the input is null. To do this, we create a JUnit test called ArrayReversorNullTest. In this test class we replace the input and expected values by null to see if the test will behave as we want it to. We then run the test.
Conclusion
You can now do TDD using JUnit and Mockito for different scenarios in your system. From here you can explore other features associated with mockito from https://site.mockito.org/
The complete code for this article can be found at https://github.com/nguezangarsene/BlogPostsCodes


Perfect tutorial, really like it!
Nice tutorial. I This is really helpful